Thursday, March 10, 2016
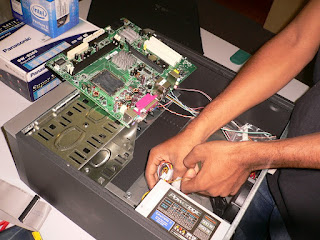
How to Disassemble and Assemble System Unit
1. Detach the power cable.
2. Remove the cover.
3. Remove the Adapter Cards.
4. Remove all the drives.
5. Remove the memory module.
 6. Remove the power supply.
7. Remove the motherboard.
8. And so on.
Assemble the System Unit -Steps
1. Computer Central Processing Unit or CPU and assemble all the parts you need on a table.
2. Computer motherboard, attach your motherboard to the chassis.
3. Random Access Memory (RAM) Sticks and install it's sticks to the motheboard.
4. Install the hard drive. Your options are Integrated Drive Electronics (IDE) or Serial Advanced Technology Attachement (SATA)Hard drives. Make sure your motherboard and Power Supply support your hard drive.
5. DVD-ROM drive, connect the CD-ROM, DVD-ROM, CD-RW, DVD-RW to the chassis. Use the screwdriver to tighten the screws firmly.
6. Install your Video, Sound and Network Cards if they are not on-board the motherboard.
7. Close your chassis. Turn on your computer after plugging it to a power source and attaching your mouse and keyboard. Open your CD-ROM Drive, place your operating system in the drive and close the drive. Enjoy your new personal computer!
Saturday, March 5, 2016
How To Install Yumi -Steps (Check Ubuntu File on Computer)
1. Make sure you have Yumi 2.0.2.0 then install it. Be sure to have your flashdrive plug in.
 1.1 When License Agreement comes out, click "Agree".
1.2 Select your USB Device.
1.3 Check the Format H: Drive(Erase Content) and choose UBUNTU.
1.4 Click the browse and select the Ubuntu 9.10 File.
1.5 When Yumi 2.0.2.0 Setup comes out, click YES.
1.6 Wait for it load and when Yumi 2.0.2.0 Setup comes out again click NO.
1.7 Click FINISH. Congratulations! You complete Yumi's Installation.
 2. Restart your computer. Plug your USB.
3. When it's turn on, click F1.
3. Click Advanced Bios Feature and Click Hard Disk Priority.
4. Click your USB and page up.
5. Click F10 to save and exit.
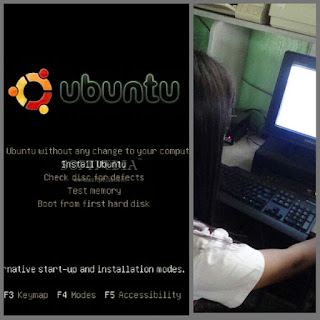
6. The Ubuntu will come out and enter "Try Ubuntu without any change"
7. And then your good to go! Yo had check your Ubuntu file to your computer.
 1.1 When License Agreement comes out, click "Agree".
 1.2 Select your USB Device.
1.3 Check the Format H: Drive(Erase Content) and choose UBUNTU.
1.4 Click the browse and select the Ubuntu 9.10 File.
1.5 When Yumi 2.0.2.0 Setup comes out, click YES.
1.6 Wait for it load and when Yumi 2.0.2.0 Setup comes out again click NO.
1.7 Click FINISH. Congratulations! You complete Yumi's Installation.
 2. Restart your computer. Plug your USB.
3. When it's turn on, click F1.
3. Click Advanced Bios Feature and Click Hard Disk Priority.
4. Click your USB and page up.
5. Click F10 to save and exit.
6. The Ubuntu will come out and enter "Try Ubuntu without any change"
7. And then your good to go! Yo had check your Ubuntu file to your computer.
Configuring Bios -6 Easy Steps
1. Restart your computer.
3. Click the Advanced Bios Feature and change it's boot. (First boot: CDROM, Second boot: Hard Disk, Third boot: Disable)
4. After that, change it's time and date.
5. Click F10 to save and exit.
6. Done! You're finished.
Tuesday, January 26, 2016
How To Install Windows XP On Your Computer
1. Make sure you have RUFUS v1 3.2.2.2 and make sure you have your flashdrive plug in.
 1.1 Click RUFUS v1 3.2.2.2 and change your USB file system into NFTS instead of FAT32 or exFAT.
1.2 Next thing, click the virtual cd beside ISO image and click the windows XP Professional Sp3 Auto Device.
1.3 Congratulations you complete the installation into your USB.
STEPS ON HOW TO INSTALL WINDOWS XP IN YOUR COMPUTER
2. Restart your computer.
3. When the computer's turning on, click F1.
 4. Go to Advance Bios and change it's boot. (First boot: Hard Disk, Second boot: CDROM Third boot: Disable)
5. Click the Hard Disk Priority.
6. Click your USB and click page up.
7. Click F10 to save and exit.
8. Wait until the computer's turning on, then click enter. When WINDOWS XP Professional Setup comes out, Format the Partition using NFTS File System (Quick)
9. When Regional and Language options comes out click Next.
10. Type your name or your school name.
11. Click next and wait for the confirmation.
12. Click any of the pictures and wait until the computer is on.
13. Congratulations! You made it.
 1.1 Click RUFUS v1 3.2.2.2 and change your USB file system into NFTS instead of FAT32 or exFAT.
1.2 Next thing, click the virtual cd beside ISO image and click the windows XP Professional Sp3 Auto Device.
1.3 Congratulations you complete the installation into your USB.
STEPS ON HOW TO INSTALL WINDOWS XP IN YOUR COMPUTER
2. Restart your computer.
3. When the computer's turning on, click F1.
 4. Go to Advance Bios and change it's boot. (First boot: Hard Disk, Second boot: CDROM Third boot: Disable)
 5. Click the Hard Disk Priority.
6. Click your USB and click page up.
7. Click F10 to save and exit.
8. Wait until the computer's turning on, then click enter. When WINDOWS XP Professional Setup comes out, Format the Partition using NFTS File System (Quick)
9. When Regional and Language options comes out click Next.
10. Type your name or your school name.
11. Click next and wait for the confirmation.
12. Click any of the pictures and wait until the computer is on.
13. Congratulations! You made it.
Subscribe to:
Comments (Atom)
